Playing the recorder is easy once you master the basics of fingering, blowing and tonguing. Click on the following hyperlinks if you are already familiar with the basics and are looking for tips on stopping squeaks, a fingering chart, for help reading a fingering chart, or for fingering quizzes.
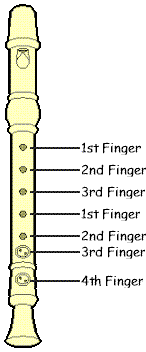
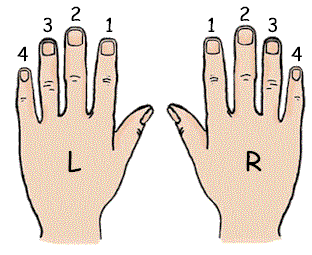
The recorder has 7 holes down the front, and one hole in the back. Each finger on your hand is assigned a specific hole to cover. Your left thumb will cover the hole on the back of your recorder.


First, you must remember the "Golden Rule" of recorder playing: "Left Hand on Top." It doesn't matter which hand you write with, or how awkward it may feel, you must always place your left hand on the top holes.
When you place your fingers over the holes, you must create a flat, tight seal. Try to avoid curving your fingers under. Instead, imagine you are being finger-printed. The tips of your fingers should reach, and possibly hang over, the side of your recorder.
Place the tip of the recorder into your mouth. Remember, you are going to play the recorder, not eat it, so make sure that your teeth are not touching the mouthpiece. If your teeth are touching the mouthpiece, you have the recorder to far into your mouth. Move the recorder outward until only your lips are around the mouthpiece.
Finally, you must blow GENTLY!!! The recorder is a small woodwind instrument, not a big, loud tuba.

To produce a clear beginning to each note, you must learn to use your tongue to begin and separate each note. The tip of your tongue should gently touch the back of your upper teeth at the point where the gum-line meets your front teeth. It is the same process as you use when you say the word "Du". You may find it easiest to practice saying "Du, du, du" until you gain a feel for the concept and can produce the same action with only air (no sound).
Reference:
Walang komento:
Mag-post ng isang Komento